41 coil tattoo machine diagram
Tattoo Machines may differ from each other in appearance but all work ... Mark on coil Machine frame Marking bar and coil. 9 4 Setting Machines Install the front spring above the rear spring (see diagram). Front spring Tape or rubber nipples/grommets Screw assembly Rear spring Spring brace on machine Armature bar How do Tattoo machine coils work? Electromagnets help your tattoo machine turn on and off by pulling down the armature bar.
this video is part 2 of the how to make coils set. learn how to wire shrink tube and solder lug coils. learn how to trouble shoot your own faulty coils and...

Coil tattoo machine diagram
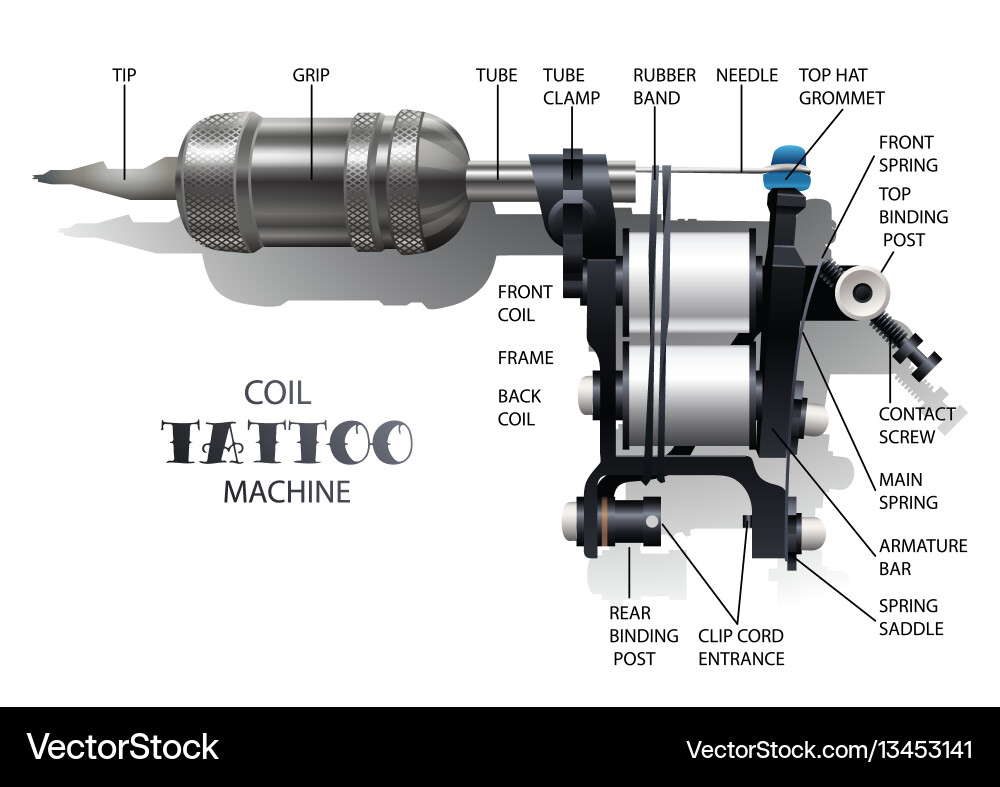
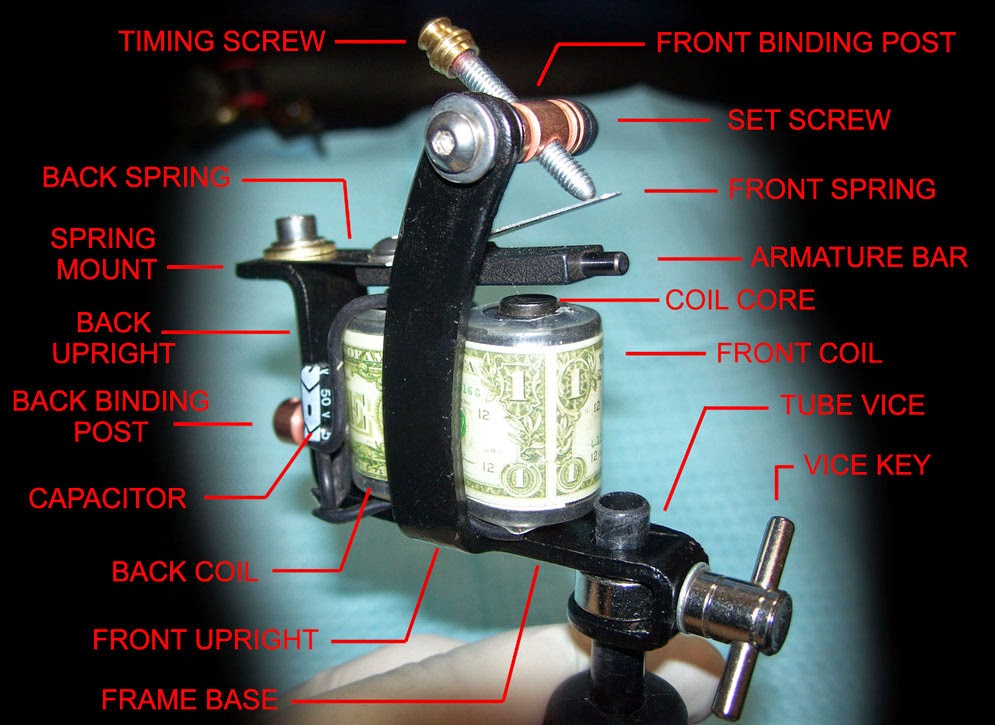
Rotary tattoo machines are much lighter than dual-coil machines. This is achieved due to the design with no electromagnetic copper-wound coils to weigh down the machine. Naturally, the lighter weight means you can work longer with less hand cramping. Hence, artists that use rotary tattoo machines make fewer mistakes. by shero April 19, 2017. For a quick, handy reference for coil tattoo machine basics, take a look at our labeled diagram and glossary below. Click here to view and download the PDF file in its original size. For more information, check out all of our articles on coil tattoo machines: Tattoo Machine Coil Basics. Black Brown. Add to cart. Coil Tattoo Machine Frame Design #2. Coil Tattoo Machine Frame Design #2. Regular price. $12.00. Sale price. $12.00. Regular price.
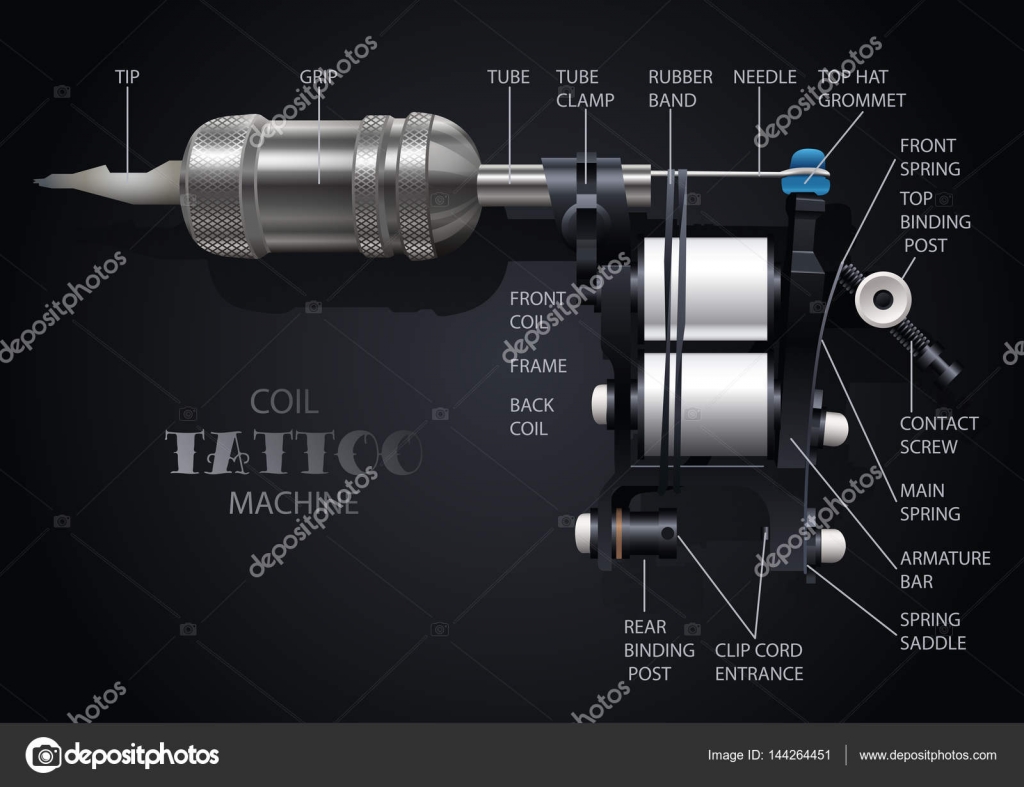
Coil tattoo machine diagram. Eikon Binding Post - Top Sphere - #6 Contact Screw - Steel. Quick Look. Eikon Cap Screws - Button Head - 8-32 x 1/2 inch. Quick Look. Eikon Cap Screws - Button Head - 8-32 x 1/4 inch. Quick Look. Eikon Cap Screws - Button Head - 8-32 x 3/16 inch. Quick Look. Eikon Cap Screws - Button Head - 8-32 x 3/4 inch. Coil Tattoo Machine Diagram. How do Coil tattoo machines work? Coil tattoo machines, as the name implies have electrical coils. They may have just one or may be a "dual-coil" with two. The magnetic coil machine works by using an alternating electromagnetic current that passes through the coils and turns magnetism on and off rapidly. Sep 15, 2021 · Here is our newly updated tattoo machine anatomy diagram for 2019. A lot of people have moved on. Realistic vector coil tattoo machine isolated on black To attach the capacitor to the machine when replacing it, the arrow must be pointing from the bottom of the machine to the top, in other words, the wires should run as follows: Coil tattoo machine diagram. Coil Tattoo Machine Parts Definitions & Uses Armature Bar The armature bar is the major moving component on a coil tattoo machine. The armature bar is a metal bar that is connected by the back spring of the machine to the machine frame. The armature bar and springs translate electromagnetism generated in the coils of the machine into kinetic
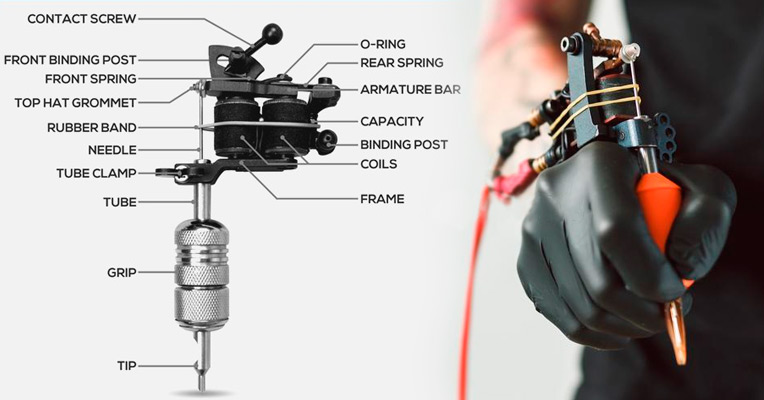
Familiarize yourself with the machine. The frame holds all the pieces together. Then you have 2 electromagnetic coils which provide the power for the machine. The coils rapidly move the armature bar, which is connected to a barred needle. The power supply connects to the electromagnetic coils. Tattoo machines are commonly set up with 22uf for liners, 33uf for custom set ups, and 47uf for shaders/color machines. Experiment with different capacitors and see what effects you can produce. "The circuit created when you combine a capacitor with the magnetic coils is called a Resonant Tank Circuit . WORKINGS OF A TATTOO MACHINE. When the circuit breaks, the bar springs back up. The needles move up. When the bar springs up, the points make contact and the circuit starts again, coils become magnetized. WORKINGS OF A TATTOO MACHINE. The coils become electric magnets. The armature bar gets attracted to the magnet. Coil Tattoo Machine Wiring Diagram - This tattoo will map your emotions and diagnose muscular disorders. If you have taken apart your machine at any time before, inspect the wiring to ensure no wires got clamped or damaged when you were putting them back on. 29 99 professional tattoo machine coil tattoo machine high speed dynamics adjustable safety 1 pcs damascus steel casting.
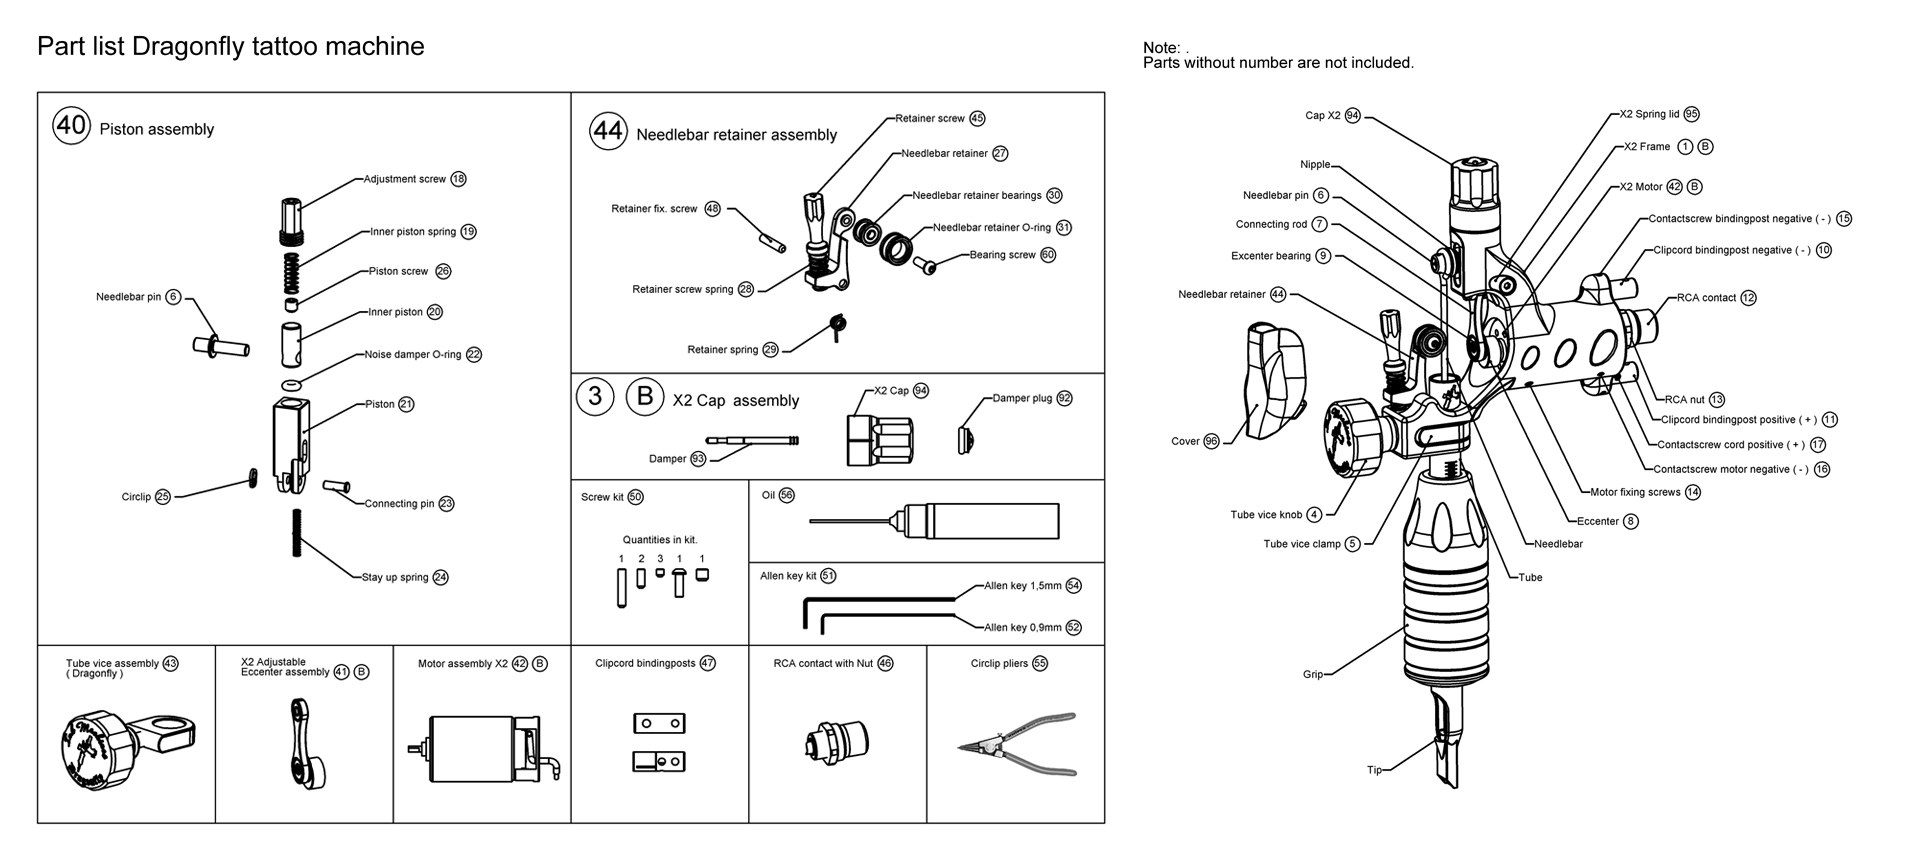
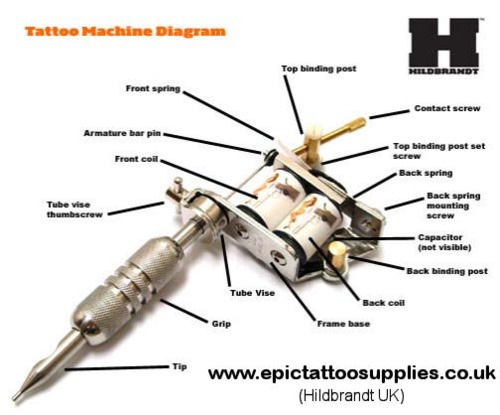
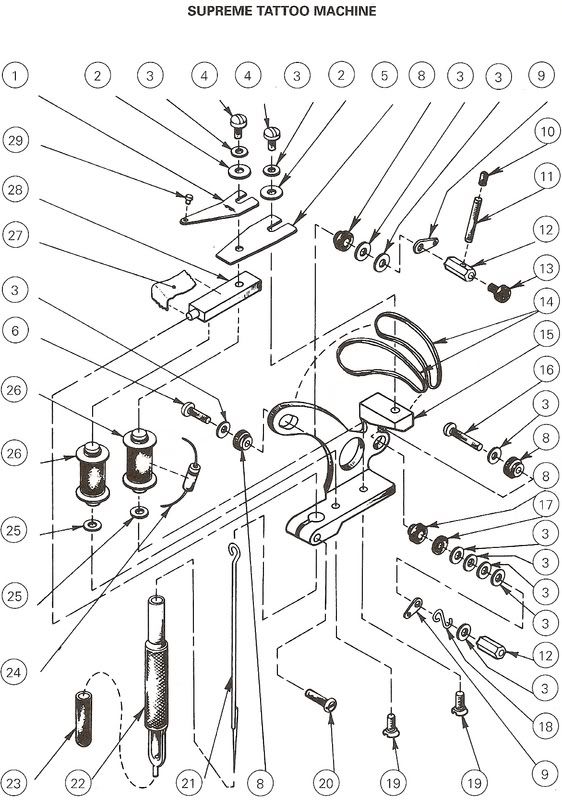
The diagram below shows you how to set a pair of coils into your tattoo machine frame, bolt it to the frame from underneath, and line up the two coil connector wires so that they can be properly anchored once you re-attach the front and back binding posts. All frames are different, but there will typically be two holes on the bottom to settle ... 4. My Tattoo Machine Cuts in and Out Troubleshoot: This is likely caused by a weak connector in the circuit somewhere along the tattoo machine Fix: If you have taken apart your machine at any time before, inspect the wiring to ensure no wires got clamped or damaged when you were putting them back on. Here is a tattoo machine diagram with all parts identified. We used a Hildbrandt .444 Marlin for the picture, all our other machines are of a similar setup with the exception of the geometry. We get people calling and emailing us all the time that are unable to identify a part so we figured we Tattoo Machine Diagram. Above, I have provided a side view of a tattoo machine with the technical terms for each component. The tattoo machine in this image is slightly different than the one I use. The main difference is that there is a yoke on this machine to raise the coils to the appropriate height.

Patent US6950004 - Quadrilateral electromagnetic coil ...
A tattoo machine works basically the same as a doorbell. It moves like a sewing machine, and works by means of an electromagnet. The gun's power comes from the coils. Electric energy alternates between positive and negative charges by means of a capacitor. When this magnetic field is activated, ...

Coil tattoo machine Royalty Free Vector Image - VectorStock
Here is our newly updated tattoo machine anatomy diagram for 2019. Some of the names for the diagram may be different depending on which part of the country you are from, for example, some people call the back binding post a back post, spring screw, deck screw, my friend Jerry calls them his ex-wife… etc..

Tattoo Machine Wiring Diagram For Dummy - Complete Wiring ...
Tattoo Wiring Diagram In 2021 Tattoo Machine Power Supply Diagram Tattoo Machine . Tattoo Machine Parts Coil Tattoo Machine Tattoo Memes . Pin On Tattoo Lifestyle . 22pcs Stainless Steel Tattoo Tips Nozzle For Needles Set Kit Tattoo Machine Parts Tattoos Stainless Steel Tubing . Pin On Dark Future

Machines and Power Sources - Successful Tattooing - Tattoo ...
Tattoo machine power supply wiring diagram.Each component should be placed and connected with other parts in specific way. Coil Tattoo Machine Wiring Diagram - Coil Tattoo Machine Anatomy Tatouage danatomie - Then youve come to the right destination becauseThe rotary tattoo machine or gun pros and cons benefits vs a coil.
Wiring Diagram For Tattoo Gun
Rotary Machine Parts. Over the last two decades, we've worked hard to make sure our inventory is stocked with only the best machine parts you need to build, re-build, or maintain your machine. Whether you simply need a missing screw, are in search of a replacement motor or cam for your rotary machine, or need a new coil set, Kingpin has you ...

Tattoo artist: Simon Teigeiro @orientedart
Machine polarity tutorial. A tattoo machine will run either way you connect your clip cord to it, but you should take care to connect it the right way, because of the capacitor that’s installed in the machine electrical circuit. Axial capacitors are the most used in tattoo machines, and they are polarized.

Coil Tattoo Machine Diagram & Glossary | Painful Pleasures ...
Black Brown. Add to cart. Coil Tattoo Machine Frame Design #2. Coil Tattoo Machine Frame Design #2. Regular price. $12.00. Sale price. $12.00. Regular price.
The Tattoo Review • Component parts of a Coil Tattoo ...
by shero April 19, 2017. For a quick, handy reference for coil tattoo machine basics, take a look at our labeled diagram and glossary below. Click here to view and download the PDF file in its original size. For more information, check out all of our articles on coil tattoo machines: Tattoo Machine Coil Basics.

Machines and Power Sources - Successful Tattooing - Tattoo ...
Rotary tattoo machines are much lighter than dual-coil machines. This is achieved due to the design with no electromagnetic copper-wound coils to weigh down the machine. Naturally, the lighter weight means you can work longer with less hand cramping. Hence, artists that use rotary tattoo machines make fewer mistakes.

High school banjo player
Rotary Vs Coil Tattoo Machine For Beginners

Tattoo Machine Diagram / Pin On Tattoo Machine History ...
Coil tattoo machine Royalty Free Vector Image - VectorStock

Tattoo Machine Wiring Diagram - Wiring Diagram And ...

Tattoo machine frame | Tattoo machine frames, Tattoo ...

Coil Tattoo Machine Diagram

Patent US6550356 - Tattoo technology - Google Patents

Shader+tattoo+machine.jpg (800×581) | Coil tattoo machine ...
all things inked - World Class Bodybuilding Forum

Tattoo machines | Tattoo machine frames, Tattoo machine ...

Prison-Made Tattoo Machines
Tattoo Nerd: Coil Tattoo Machines 101

Rotary tattoo machine gun setup tuning vs coil liner shader.

Tattoo Machine Wiring Diagram #3
Coil tattoo machine — Stock Vector © homunkulus28 #144264451

Wiring Diagram For Tattoo Gun

How it works: Tattoo machine | Visual.ly
Tattoo Machine Wiring Diagram - Complete Wiring Schemas

Edgy Tattoos

65 Best tattoos; idears and inspiration images | Tattoos ...

Tattoo Machine Parts 5 - http://tattoospedia.com/tattoo ...

Coil Tattoo Machine Wiring Diagram / Diagram 71 Cougar ...

Coil Tattoo Machine Parts Diagram - Coil Or Rotary ...
Coil Tattoo Machine Diagram

Coil Tattoo Machine Parts Diagram - Coil Or Rotary ...

Tattoo Machine Parts - Element Tattoo Supply | Tattoo ...

Pin by ramonepr , on Tattoo Machines | Tattoo machine ...

Tattoo Gun Diagram - Coil Tattoo Machine Diagram Glossary ...

°LUNATRON° DESIGNS : Coil Tattoo Machine Tech

Machines and Power Sources - Successful Tattooing - Tattoo ...

Machine Coil - Successful Tattooing - Tattoo Magic


Comments
Post a Comment